浅谈Vue组件传参(常见的几种通信方式)
Vue的通信方式,也可以说是传参方式。主要分为四种:
- 父子传参
- 子父传参
- 相邻兄弟传参(亲兄弟)
- 远兄弟传参(表兄弟)
一、父子传参
原理:父控制子,通过子组件的props属性,抛出子组件自定义标签属性,来接收父组件的操作状态
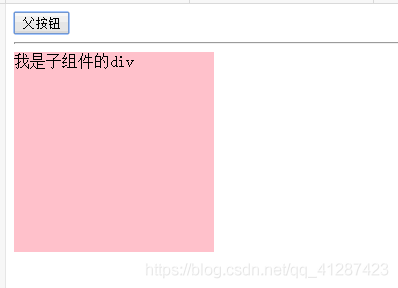
例子:父级里的一个按钮,控制子组件里的一个div的显示隐藏
<!DOCTYPE html>
<html lang="en">
<head>
    <meta charset="UTF-8">
    <title>Document</title>
</head>

<style>
    .div{
        width:200px;
        height:200px;
        background:pink;
    }
</style>

<body>
    <!-- 这里的app范围就是  子组件son  的父级 -->
    <div id="app">
        <button @click='change'>父按钮</button>
        <hr>
        <!-- **********  自定义标签属性test,接收父级的state ************-->
        <son :test='state'></son>
    </div>

    <template id="tp1">
        <div>
            <!-- ************  调用自定义属性test **************-->
            <div class="div" v-show='test'>我是子组件的div</div>
        </div>
    </template>

    <script src="../vue/vue.js"></script>
    <script>
        // 局部定义  子组件son
        new Vue({
            el:"#app",
            data:{
                state:true
            },
            methods:{
                change(){
                    this.state = !this.state;
                }
            },
            components:{
                son:{
                    template:"#tp1",
                    //*********** 抛出自定义标签属性 ***************
                    props:['test']
                }
            }
        })
    </script>

</body>
</html>
效果:
二、子父传参
原理:子控制父,子组件绑定自定义事件,来处理父组件的方法函数,通过.$emit(‘自定义事件’,[参数])来触发属于自己的自定义事件
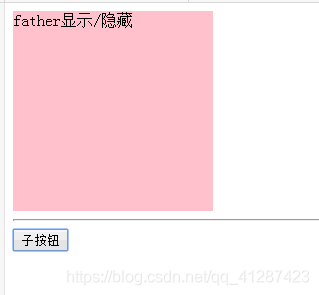
例子:子组件里一个按钮,控制父组件里的一个div的显示隐藏
<!DOCTYPE html>
<html lang="en">
<head>
	<meta charset="UTF-8">
	<title>Document</title>
</head>

<style>
    .div{
        width:200px;
        height:200px;
        background:pink;
    }
</style>

<body>

	<div id="app">
        <c1></c1>
    </div>

     <!-- 父组件c1   子组件c2   子组件自定义事件test-->

    <template id="c1">
        <div>
            <div class="div" v-show='state'>father显示/隐藏</div>
            <hr>
            <!--************ 子组件c2自定义事件,执行父组件c1的方法函数change_f ***************** -->
            <c2 @test='change_f'></c2>
        </div>
    </template>

    <template id="c2">
        <div>
            <button @click='change_son'>子按钮</button>
        </div>
    </template>

<!-- 引入Vue.js框架文档,可在官方文档下载-->
<script src='../vue/vue.js'></script>
<script>
    //全局定义
    // 实例化 父组件c1
    Vue.component("c1",{
        template:"#c1",
        data(){
            return {
                state:true
            }
        },
        methods:{
            change_f(){
                this.state = !this.state;
            }
        }
    });
    // 实例化 子组件c2
    Vue.component("c2",{
        template:"#c2",
        methods:{
            change_son(){
                // ************ 在子组件方法里,触发子组件自定义事件 ******************
                this.$emit("test")
            }
        }
    })
    //实例化一个Vue对象
	   new Vue({
        el:"#app"
    });
</script>
</body>
</html>
效果:
三、相邻兄弟传参(亲兄弟)
原理:通过一个公有的父元素作为桥接(实例 组件),结合父子props 传参 、子父自定义事件
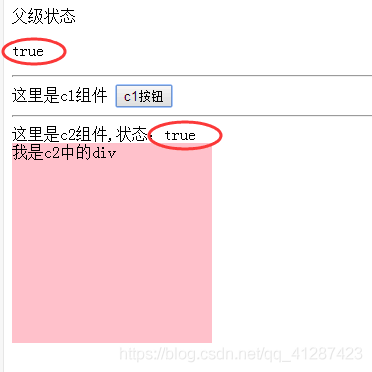
例子:c1、c2是兄弟关系 c1可用控制c2里元素的显示隐藏
<!DOCTYPE html>
<html lang="en">
<head>
	<meta charset="UTF-8">
	<title>Document</title>
</head>

<style>
	.div{
		width:200px;
		height:200px;
		background:pink;
	}
</style>

<body>
	<div id="app">
		父级状态
		<p>{{state}}</p>
		<hr>
		<c1 @test_c1='change_f'></c1>
		<hr>
		<c2 :test_c2='state'></c2>
	</div>

	<template id="c1">
		<div>这里是c1组件
			<button @click='change_c1'>c1按钮</button>
		</div>
	</template>

	<template id="c2">
		<div>这里是c2组件,状态:{{test_c2}}
			<div class="div" v-show='test_c2'>我是c2中的div</div>
		</div>
	</template>

<script src='../vue/vue.js'></script>
<script>

	Vue.component("c2",{
		template:"#c2",
		props:['test_c2']
	})

	Vue.component("c1",{
		template:"#c1",
		methods:{
			change_c1(){
				this.$emit("test_c1")
			}
		}
	})

	new Vue({
		el:"#app",
		data:{
			state:true
		},
		methods:{
			change_f(){
				this.state = !this.state;
			}
		}
	})
</script>
</body>
</html>
效果:
四、远兄弟传参(表兄弟)
原理:通过创建一个中间实例,注册一个事件,在被控组件中,通过事件携带要执行的函数,在主控组件中,通过事件,改变相应的操作
例子:son1组件触发按钮来改变son2组件中name的内容,创建angel实例:let angel = new Vue(),注册test事件:angel.on(′test′ , fun ) , 主控组件操作 : angel.on('test',fun),主控组件操作:angel.on(′test ′ ,fun),主控组件操作:angel.emit('test' , '参数')
<!DOCTYPE html>
<html lang="en">
<head>
	<meta charset="UTF-8">
	<title>Document</title>
</head>

<body>
	<div id="app">
		<father></father>
	</div>
	<template id="father">
		<div>
			这是父组件
			<hr>
			<son1></son1>
			<hr>
			<son2></son2>
		</div>
	</template>
	<template id="son1">
		<div>
			{{name}}
			<button @click='click_son1'>触发angle中间事件</button>
		</div>
	</template>
	<template id="son2">
		<div>
			{{name}}
		</div>
	</template>

<script src='../vue/vue.js'></script>
<script>
	//********** 创建一个angle实例,作为中间变量(全局) **************
	let angel = new Vue();

	new Vue({
		el:"#app",
		components:{
			father:{
				template:"#father",
				components:{
					son1:{
						template:"#son1",
						data(){
							return {
								name:"我是son1"
							}
						},
						methods:{
							click_son1(){
				// ***************  通过angel注册的test事件,修改son2中name的值 ************
								angel.$emit('test','哈哈!修改成功!')
							}
						}
					},
					son2:{
						template:"#son2",
						data(){
							return {
								name:"我是son2"
							}
						},
						methods:{
							change(val){
								this.name = val;
							}
						},
						//生命周期,自动执行,组件准备ok就可用
						mounted(){
				// ***************  通过angel注册的test事件,将son1的修改方法传过去 ************
							angel.$on('test',this.change)
						}
					}
				}
			}
		}
	})
</script>

</body>
</html>
效果:
点击前:
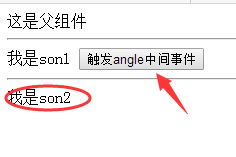 点击后:
点击后:

本文由 创作,采用 知识共享署名4.0 国际许可协议进行许可。本站文章除注明转载/出处外,均为本站原创或翻译,转载前请务必署名。最后编辑时间为: 2021/12/31 08:13