Spring Cloud 教程第十四章 spring-cloud-starter-config使用教程
Spring cloud 的使用很简单,但是要深入就需要花费更多的精力。本文我们通过一个案例来搞定 spring-cloud-starter-config,也就是配置中心的使用。
配置中心其实理解起来很简单,通过下面的一张图,我相信你就会明白吧。
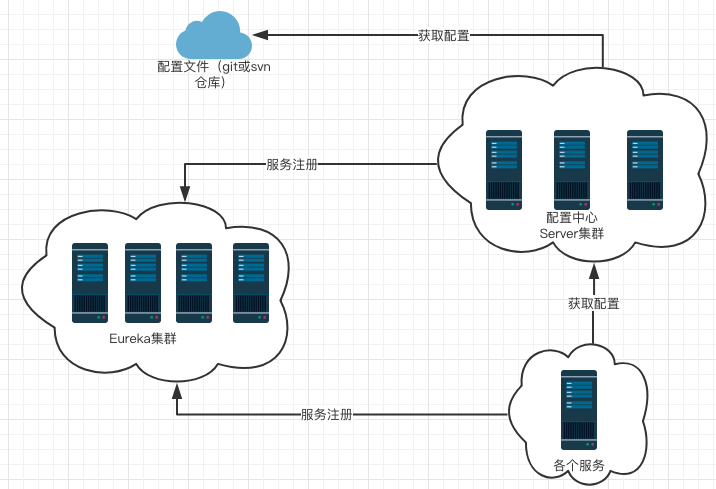
别看这张图丑,但是能大致说明整个配置中心的架构交互方式。下面我们开始具体的代码吧!
还是老规矩,我们先创建一个名为 xttblog-config-client 的工程。pom.xml 的配置内容如下:
<parent>
    <groupId>org.springframework.boot</groupId>
    <artifactId>spring-boot-starter-parent</artifactId>
    <version>1.5.13.RELEASE</version>
</parent>

<dependencyManagement>
    <dependencies>
        <dependency>
            <groupId>org.springframework.cloud</groupId>
            <artifactId>spring-cloud-dependencies</artifactId>
            <version>Edgware.SR4</version>
            <type>pom</type>
            <scope>import</scope>
        </dependency>
    </dependencies>
</dependencyManagement>
<dependencies>
    <dependency>
        <groupId>org.springframework.cloud</groupId>
        <artifactId>spring-cloud-starter</artifactId>
    </dependency>

    <dependency>
        <groupId>org.springframework.cloud</groupId>
        <artifactId>spring-cloud-starter-config</artifactId>
    </dependency>

    <dependency>
        <groupId>org.springframework.cloud</groupId>
        <artifactId>spring-cloud-starter-eureka-server</artifactId>
    </dependency>

    <dependency>
        <groupId>org.springframework.boot</groupId>
        <artifactId>spring-boot-starter-actuator</artifactId>
    </dependency>

    <dependency>
        <groupId>org.springframework.boot</groupId>
        <artifactId>spring-boot-starter-web</artifactId>
    </dependency>

    <dependency>
        <groupId>org.springframework.boot</groupId>
        <artifactId>spring-boot-starter-test</artifactId>
        <scope>test</scope>
    </dependency>
</dependencies>
然后是 bootstrap.yml 文件的内容:
server:
  port: 8876

eureka:
  instance:
    hostname: localhost
  client:
    serviceUrl:
      defaultZone: http://${eureka.instance.hostname}:8761/eureka/

spring:
  application:
    name: xttblog
  cloud:
    config:
      label: master
      profile: dev
      # 添加zuul 的注意,这里配zuul的地址进行转发
      uri: http://localhost:8877/
这里需要说一下的是为什么我们写的是 bootstrap.yml 而不是 application.yml。这是因为 spring boot 的加载属性文件有优先级。bootstrap.yml 的优先级高,需要在加载属性之前去 spring cloud config server 上取配置文件,那 spring cloud config 相关配置就是需要最先加载的,而 bootstrap.yml 的加载是先于 application.yml 的,所以 config client 要配置 config 的相关配置就只能写到 bootstrap.yml 里了。
接着就是启动类了,代码如下:
@SpringBootApplication
public class ConfigClientApplication {
    public static void main(String[] args) {
        SpringApplication.run(ConfigClientApplication.class, args);
    }
}
下面我们再来写一个 Controller 类,来验证我们配置文件获取的内容对不对。代码如下:
@RestController
public class XttblogController {

    @Value("${site.url}")
    private String url;
    @Value("${site.active}")
    private String active;

    @RequestMapping("/test")
    public String test(){
        return "test:test config client, url: " + url + ",active: " + active;
    }
}
到这里所有的代码都写完了,我们启动程序。在浏览器里输入 http://localhost:8876/test 就能看到我们成功的获取到了 xttblog-dev.yml 配置文件中的属性内容。
到这里看似 Spring Cloud 的内容差不多写完了,但是你仔细想想,我们是不是还缺点什么。后面我们继续学习!
本文由 创作,采用 知识共享署名4.0 国际许可协议进行许可。本站文章除注明转载/出处外,均为本站原创或翻译,转载前请务必署名。最后编辑时间为: 2021/05/17 10:32