看源码,我为什么建议你先从 SpringBoot 开始
在面试过程中,很多面试官都会或多或少的问你,有没有看过源码?
如果你回答,没有!那就换其他问题。但是如果你工作时间比较长了,比如 3 年了。但你还没有看过一些框架的源码,那么很可能你就被 pass 掉了。
面对这种情况,你该怎么办?
必须的先看几套啊。唬住了就 50K,唬不住就只能 5K 了。
那么看几套,行啊,我也看了,但是看不懂啊,无存下手。哎,那么这个时候,我推荐你先从 SpringBoot 的源码开始看起。为什么呢?原因有以下 3 点:
- 热门。SpringBoot 有多热门,我相信大家比我都清楚吧。你和她相处的时间甚至比和你女朋友相处的时间要长。
- 主流程复杂度不大。SpringBoot 的主流程非常的简单。猜透这个框架的原理和设计思路比猜对女孩子的心思简直简单太多了!
- 面试必问。像 if else 这种"坦诚相待"的代码面试根本没人问,相反像 SpringBoot 这样做了大量自动配置的"犹抱琵琶半遮面"的设计面试总是一上来就要把原理扒个精光。
所以,为了高薪。我们就要卧薪尝胆。
主流程不复杂?嗯,真不复杂,不行我给你简单的解释一下。
第一步,从 @SpringBootApplication 开始。
@SpringBootApplication
public class XttblogApplication {
    public static void main(String[] args) {
        SpringApplication.run(XttblogApplication.class, args);
    }
}
第二步,看 @SpringBootApplication 注解类。
@Target(ElementType.TYPE)
@Retention(RetentionPolicy.RUNTIME)
@Documented
@Inherited
@SpringBootConfiguration
@EnableAutoConfiguration
@ComponentScan(excludeFilters = {
    @Filter(type = FilterType.CUSTOM, classes = TypeExcludeFilter.class),
    @Filter(type = FilterType.CUSTOM, classes = AutoConfigurationExcludeFilter.class) })
public @interface SpringBootApplication {
    ...
}
第三步,看 @EnableAutoConfiguration 注解类。
@Target(ElementType.TYPE)
@Retention(RetentionPolicy.RUNTIME)
@Documented
@Inherited
@AutoConfigurationPackage
@Import(EnableAutoConfigurationImportSelector.class)
public @interface EnableAutoConfiguration {
    ...
}
第四步,看 EnableAutoConfigurationImportSelector 类。
@Deprecated
public class EnableAutoConfigurationImportSelector
    extends AutoConfigurationImportSelector {
    @Override
    protected boolean isEnabled(AnnotationMetadata metadata) {
        if (getClass().equals(EnableAutoConfigurationImportSelector.class)) {
            return getEnvironment().getProperty(
                EnableAutoConfiguration.ENABLED_OVERRIDE_PROPERTY, Boolean.class,
                true);
        }
        return true;
    }
}
第五步,看 AutoConfigurationImportSelector 类中的 selectImports 和 getCandidateConfigurations 方法。
@Override
public String[] selectImports(AnnotationMetadata annotationMetadata) {
    if (!isEnabled(annotationMetadata)) {
        return NO_IMPORTS;
    }
    try {
        AutoConfigurationMetadata autoConfigurationMetadata = AutoConfigurationMetadataLoader
            .loadMetadata(this.beanClassLoader);
        AnnotationAttributes attributes = getAttributes(annotationMetadata);
        List<String> configurations = getCandidateConfigurations(annotationMetadata,
                                                                 attributes);
        configurations = removeDuplicates(configurations);
        configurations = sort(configurations, autoConfigurationMetadata);
        Set<String> exclusions = getExclusions(annotationMetadata, attributes);
        checkExcludedClasses(configurations, exclusions);
        configurations.removeAll(exclusions);
        configurations = filter(configurations, autoConfigurationMetadata);
        fireAutoConfigurationImportEvents(configurations, exclusions);
        return configurations.toArray(new String[configurations.size()]);
    }
    catch (IOException ex) {
        throw new IllegalStateException(ex);
    }
}
protected List<String> getCandidateConfigurations(AnnotationMetadata metadata,
                                                  AnnotationAttributes attributes) {
    List<String> configurations = SpringFactoriesLoader.loadFactoryNames(
        getSpringFactoriesLoaderFactoryClass(), getBeanClassLoader());
    Assert.notEmpty(configurations,
                    "No auto configuration classes found in META-INF/spring.factories. If you "
                    + "are using a custom packaging, make sure that file is correct.");
    return configurations;
}
第六步,SpringFactoriesLoader 类的 loadFactoryNames 方法。
public static List<String> loadFactoryNames(Class<?> factoryClass, ClassLoader classLoader) {
    String factoryClassName = factoryClass.getName();
    try {
        Enumeration<URL> urls = (classLoader != null ? classLoader.getResources(FACTORIES_RESOURCE_LOCATION) :
                                 ClassLoader.getSystemResources(FACTORIES_RESOURCE_LOCATION));
        List<String> result = new ArrayList<String>();
        while (urls.hasMoreElements()) {
            URL url = urls.nextElement();
            Properties properties = PropertiesLoaderUtils.loadProperties(
                new UrlResource(url));
            String factoryClassNames = properties.getProperty(factoryClassName);
            result.addAll(
                Arrays.asList(
                    StringUtils.commaDelimitedListToStringArray(factoryClassNames)
                )
            );
        }
        return result;
    }
    catch (IOException ex) {
        throw new IllegalArgumentException(
            "Unable to load [" + factoryClass.getName() +
            "] factories from location [" + FACTORIES_RESOURCE_LOCATION + "]", ex);
    }
}
重点看这个 FACTORIES_RESOURCE_LOCATION 。
public static final String
    FACTORIES_RESOURCE_LOCATION = "META-INF/spring.factories";
以 spring-boot-autoconfigure-1.5.13.RELEASE.jar 为例,看下它的 META-INF/spring.factories 文件。
# Auto Configure
org.springframework.boot.autoconfigure.EnableAutoConfiguration=\
org.springframework.boot.autoconfigure.admin.SpringApplicationAdminJmxAutoConfiguration,\
org.springframework.boot.autoconfigure.aop.AopAutoConfiguration,\
... 省略
到此整个 SpringBoot 的自动配置,自动加载主流程源码已经看完了。
整个过程,总结一下就是你把你的组件的全类名给我,我帮你初始化你给我的这些 bean。
这个过程我在啰嗦一下,流程如下:
- 启动 main 函数,加载 @SpringBootApplication。
- @SpringBootApplication 会拿到 META-INF/spring.factories 中需要自动配置的类的全名。
- 把自动配置的类全名放入 ImportSelector 中,从而创建了自动配置类,根据自动配置类中的逻辑,进行相应的自动配置。
最后,整理了一张图。送给大家!
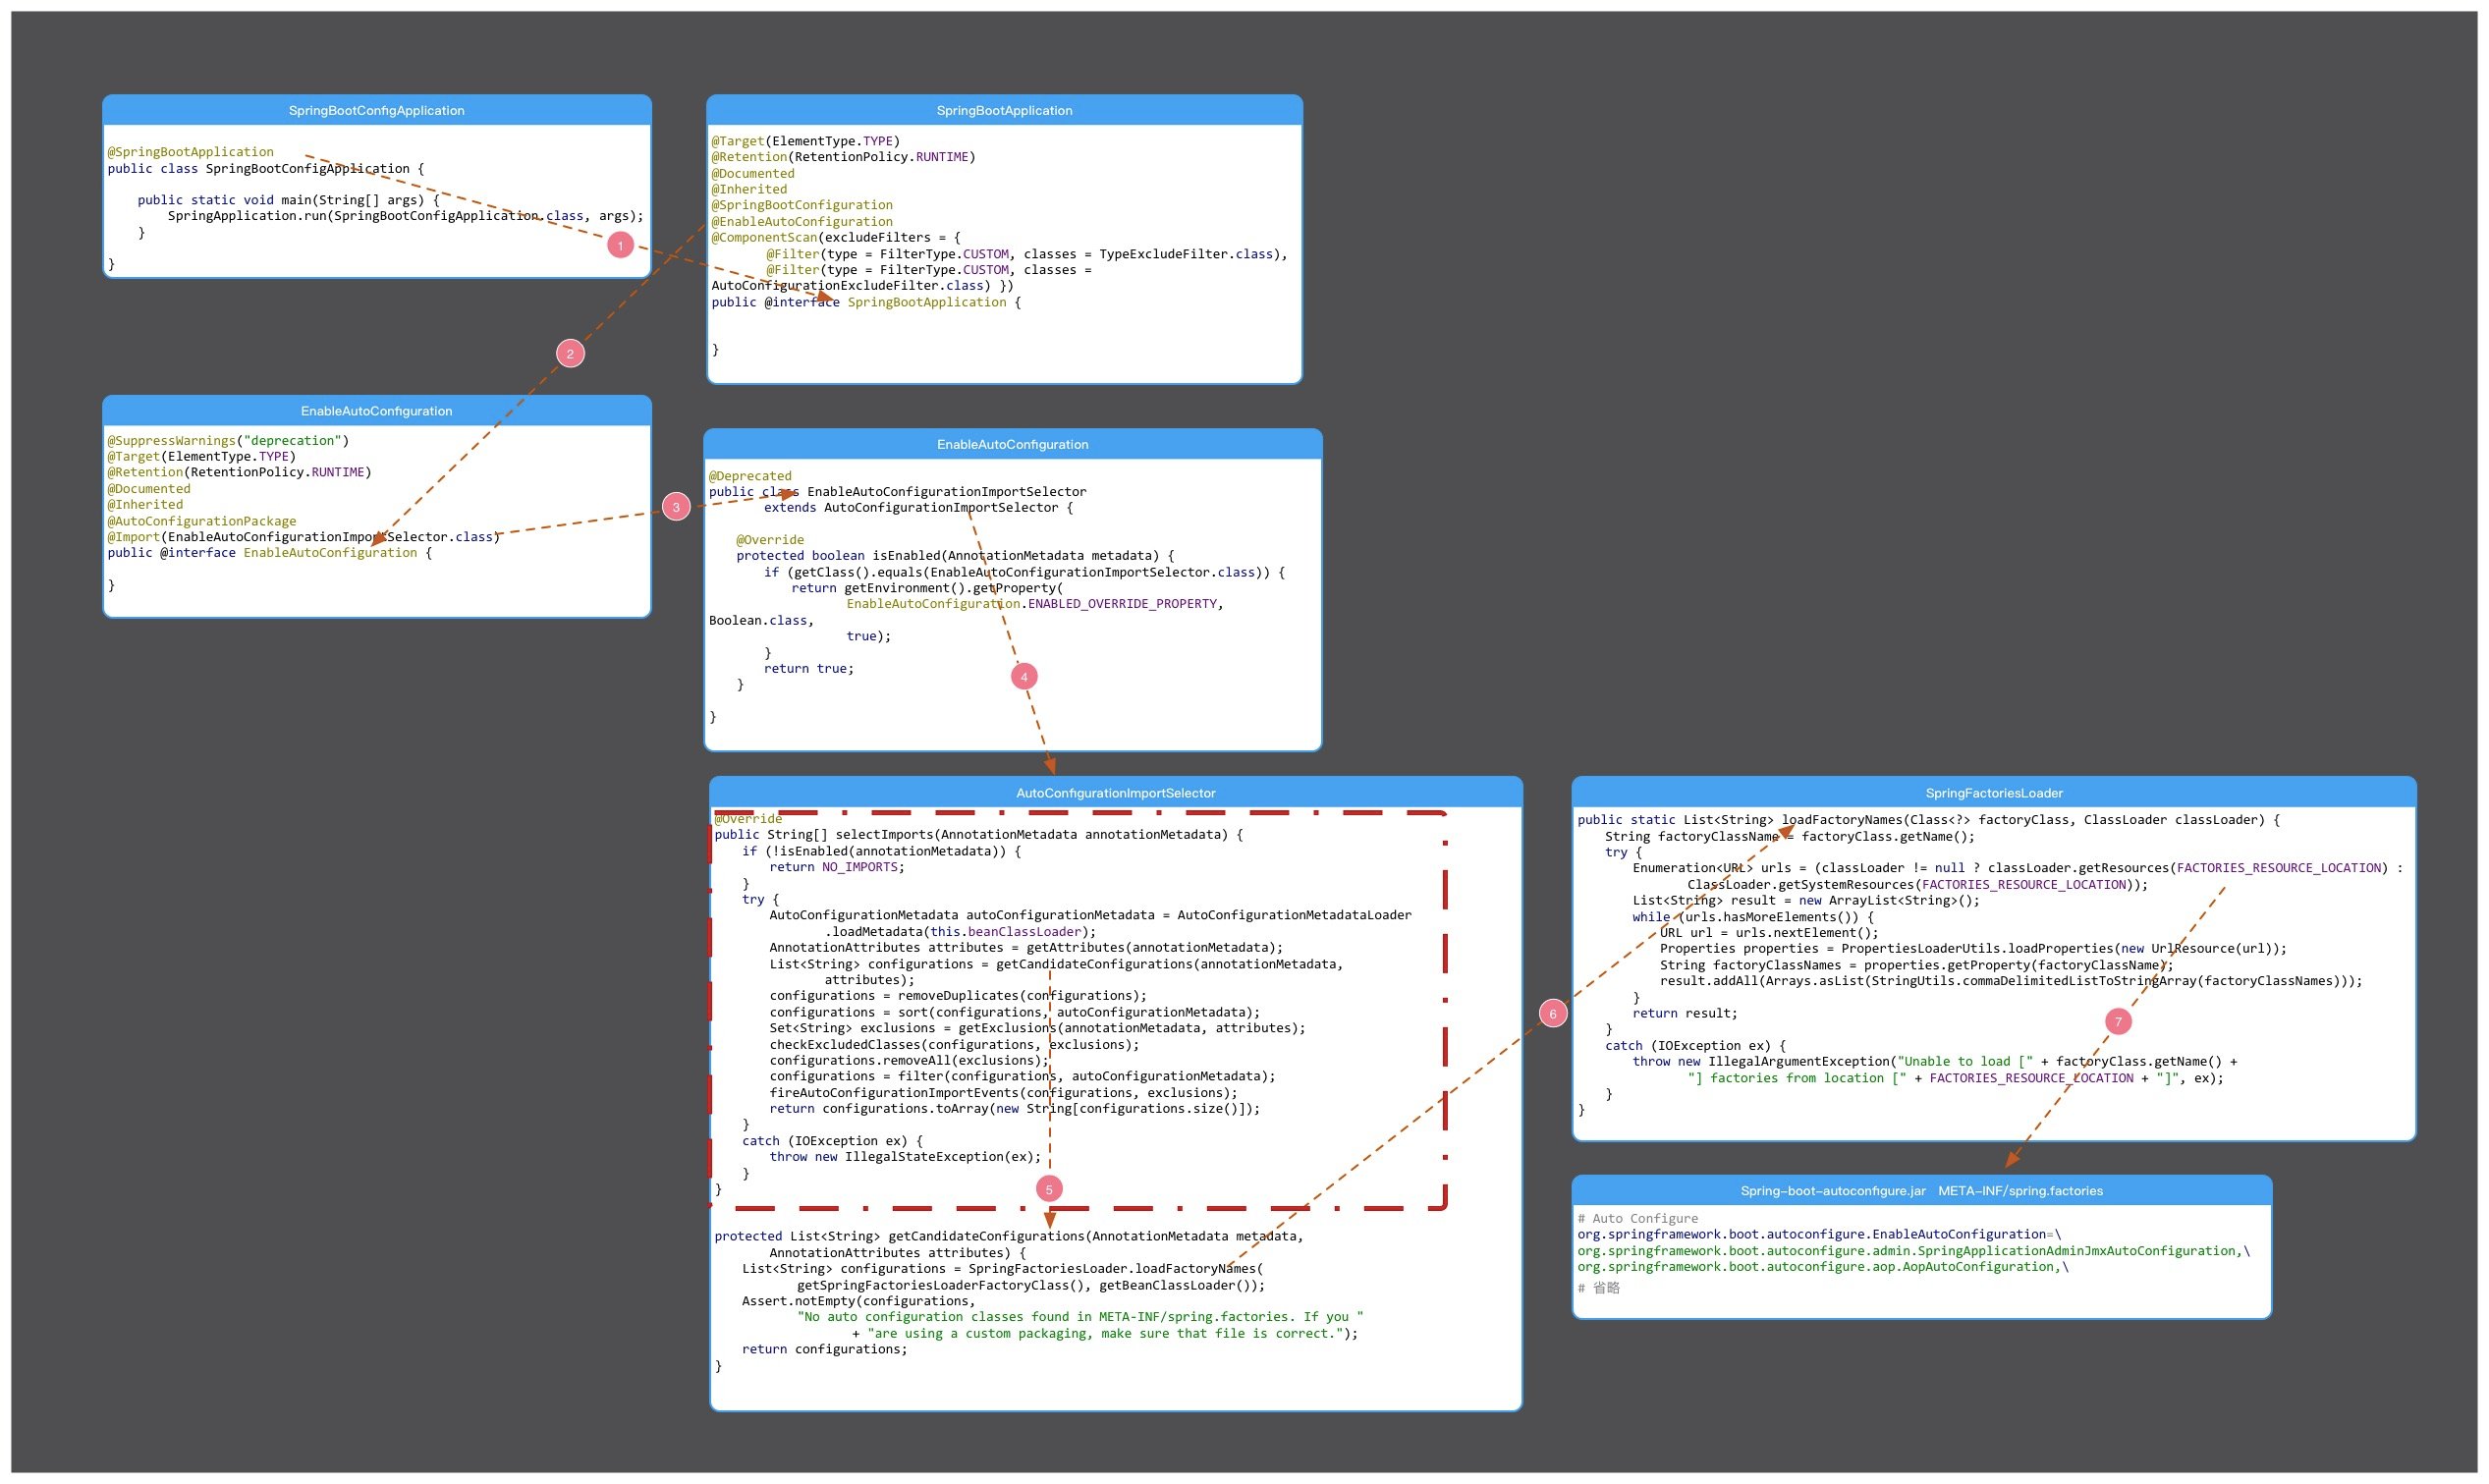
自己放大了,慢慢看。SpringBoot 的自动配置和原理就是这么简单,所以,我推荐你先把它看明白了。让本该造火箭的你,不再拧螺丝!
本文由 创作,采用 知识共享署名4.0 国际许可协议进行许可。本站文章除注明转载/出处外,均为本站原创或翻译,转载前请务必署名。最后编辑时间为: 2021/04/17 03:55